You can create categories that your agents can attach to their notes. This allows an at-a-glance view of the types of notes which have been added to a contact's history.
Furthermore, note categories allow you to note which notes are public or internal.
In your Admin account:
- Go to the General Settings page.
- Go to the Note categories subpage.
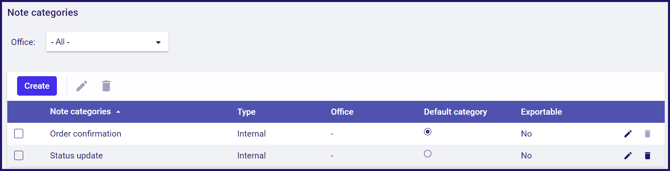
Selecting a default note category
You must select one of your note categories as the default for all new notes. This will be set as the category for all notes, unless the agent changes it.
- Click to select the note category that you wish to be the default in the Default category column.
Creating note categories
To create a new note category:
- Click the Create button.
- Type a name for the Note category.
- Click to select a Category type.
- Optionally, click the Office drop-down list and select which office this note category is for. The note category will not be available for other offices.
- Optionally, click to tick the Exportable check box.
- Click the Create button.
You can have a maximum of ten note categories. If you already have ten note categories you will not be able to create a new one until you delete an old note category.
Deleting note categories
To delete a note category:
- Click the
icon to the right of the category you wish to delete.
When you delete a note category that has already been applied to notes by agents, those notes will all be set to the default note category.