Creating a call queue
To create a queue for inbound calls, in your Admin account:
- Go to the Inbound page.
- Go to the Queues subpage.
- Click the Create call queue button.
- You will be given a reminder about the associated cost for creating a call queue. Click OK.
The Create call queue form offers many options for controlling your queue. While the only mandatory fields are Name, Priority, Project and Queue’s timeout, the other options let you create the kind of behaviour that suits your needs.
Settings
The form is divided into several sections. In the General Settings section, the first few fields cover the basic structure of the queue:

- Click to tick the Queue is active checkbox. If you don’t, calls directed to this queue will immediately disconnect. In the list of queues, active queues have a green dot next to their name. If you are creating the queue before you need to use it, leave this unticked.
- Type a Name for the queue. Give the queue a name which reminds you about its purpose, particularly if you have many queues.
- Type a Priority value, between 1 and 100. The higher the number, the higher the priority. When an agent is available, they will be offered a call (or message) from whichever queue has the highest priority.
- Click the Project drop-down list to select the project associated with this queue. Remember multiple queues can share the same project.
In reports, call queues are normally recognised by the associated phone number. If your queue does not have a number, perhaps because it is accessed only via a flow, you can type a Report identifier which will be used in place of a number in reports like the Inbound Cluster Report.
Announcements
The next settings cover the automatic announcements that the queue plays for the customer. These announcements are WAV or MP3 files which you can upload to LeadDesk in your Admin account on the Inbound page’s Announcements subpage.
To select the behaviour of your announcements on this queue:

- Click the Join announcement drop-down list to choose which announcement plays when the caller first joins the queue.
- Click the Periodic announcement drop-down list to choose which announcement the caller will hear at regular intervals while they are in the queue.
- You can also click to tick the checkbox to Activate position announcement. If you do, the caller will hear an announcement about their place in the queue. This will alternate with the Periodic announcement.
- The Interval field lets you specify how often the caller hears the announcements.
Breakouts and timeouts
The next settings cover what to do with calls that are in the queue for an extended period.
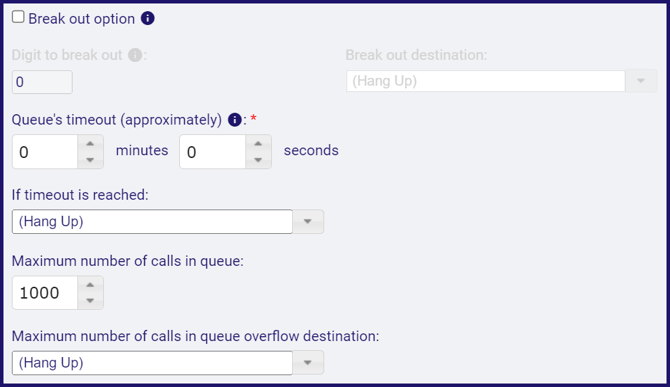
The Break out options let the caller opt out of the queue.
- Click to tick the Break out option checkbox to let the caller leave the queue.
- Digit to break out lets you specify what the caller must press to leave the queue. This can be a single digit 0 to 9, or the * or # key.
- When the caller leaves the queue, the Break out destination lets you decide what happens to the call. You can either hang up, play an announcement, or direct the call to a flow (and from there on to another queue, menu, or callback request).
The Queue’s timeout options let you control what happens if the caller waits too long.
- First, you must specify how long, in minutes and seconds before the call times out. The timeout can be affected by several external factors, including network latency, to be sure of meeting SLAs set this value to about 5 seconds lower than the SLA.
- Then click the If timeout reached drop-down list to decide what happens to the call. You can either hang up, play an announcement, or direct the call to a flow (and from there on to another queue, menu, or callback request).
Likewise you can determine what to do if there are too many calls in the queue.
- Type a number for the Maximum number of calls in queue. The maximum allowed value is 1000.
- Click the overflow destination drop-down list to select what to do if the limit is reached. You can either hang up, play an announcement, or direct the call to a flow (and from there on to another queue, menu, or callback request).
Agent related settings
The last of the General Settings let you manage agent interactions with the queue:
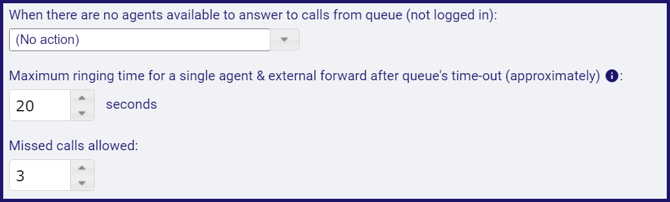
- Click the drop-down list to define what happens when a call reaches this queue but there are no agents available to take the call. This may be no action, hanging up, playing an announcement, or forwarding the call to a flow.
- Define the number of seconds a call can ring for.
- If an agent misses too many consecutive calls, they will receive a “ban”. This is to prevent calls being offered to an agent who is away. The agent must log out and log back in to be able to take calls again. The Missed calls allowed lets you decide how many calls the agent can miss before getting a ban.
Queue's skill
The Queue’s skill section lets you control which skills are required to serve that queue, and as a result, which agents will be able to take calls from that queue. For more information about setting agents’ skills see this article.
There are two ways that you may manage the skills for your queue:
- If you have the Edit skills button, click it and you will be able to choose the skills relevant to this queue. Skip to the Queue's opening hours section, below.
- If you have the Edit skills and agents button, click it to open the skills wizard.
The following assumes you are using the skills wizard.
- Click the Edit skills and agents button.
|
The skills wizard will open, showing the first page, 1. Queue skills and agents.
|
|
Repeat for all skills appropriate to this queue. As you change the list of required skills, the Serving agents and Available agents list will update. The Serving agents will list only those agents with the required skills to serve this queue. |
|
|
|
If you removed an agent from the Serving agents list, you will see a list of skills to be removed from that agent. |
|
If you added agents to serve this queue, you will see a list of them here. Each agent will automatically receive one point in the appropriate skills. You may increase the number of Points as appropriate. |
|
You will see a summary of all the changes to agents and queues. If everything is correct:
|
Important: The changes that you make to the skill requirements for this queue do not take effect until you create or save the queue, as well as saving the skill choices here.
Queue's opening hours
The Queue’s opening hours section is one of two ways to define what times the queue is open.
Alternatively, if you use a flow to direct calls to this queue, the opening times can be set within the flow with the Timing applet.
If you have multiple queues, and access to Advanced flows, you can set the opening time for one queue following the instructions here as the master opening hours. The Timing applet can then be used to apply those opening hours to other queues.
Note: The timings in this section are based on the Default timezone defined in the Settings page, in the Global settings subpage.
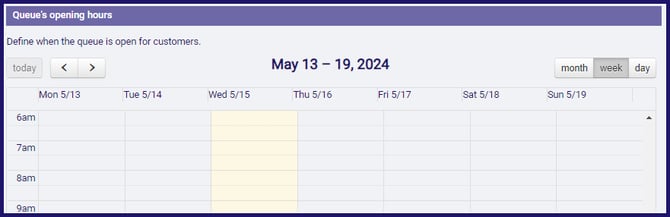
- Click and drag to highlight the normal opening times for an individual day.
The Add opening hours window opens.
- Click to select the days of the week this schedule repeats for.
- Click the Add button.
You can then disable particular exceptions, for example for public holidays.
- Click to view the dates by month.
- Navigate to the day you wish to exclude.
- Point your mouse to the right of the blue bar, to see a white trash can icon.
- Click the trash icon.
- To exclude just the selected day, click the Selected option.
- Click the OK button.
Underneath the opening hours calendar, there is a drop-down list which lets you select what happens if a call arrives at this queue when it is closed. If you used a flow to direct the call, the flow control will override this setting.
SLA
Next, you can define a service level for this queue. This is used in certain reports including the Calls by Inbound Queue report.
- Type a target value for Answer percent.
- Type a duration for Time in Queue, in seconds.
Callbacks
Finally, you can set your queue to automatically create a callback when a call stays in the queue for a specific period.
- To do this, click to tick the checkbox at the top of the Callbacks section.
- Type a number of seconds in the Time limit field.
- Type a Callback comment which will appear on all callbacks generated this way, so agents will be able to identify them.
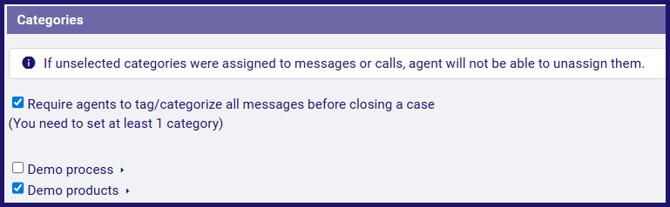
Categories
If you are using categories, this is where you select the categories that will be available to agents taking calls from this queue.
- If you want your agents to categorise every call before they can assign an outcome to a conversation, click to tick the checkbox Require agents to...
- Click to tick which groups of categories you wish to be available to agents serving this queue.
Optional settings
- If the caller calls back within the 'Preferred agent duration' (a setting in projects), you may wish to route the call back to the same agent, if they are available. If you do, click to tick Return callers...
- If you want agents to be able to pick calls from a queue manually, click to tick Allow agents to see the content of the queue...
- Normally, agents can take calls from call queues even if they don't have access to the correct project. To have it so that the agent does need access rights to the project, click to tick To access the queue...
- Click the When the agent is using mobile or external UI... to select which number the agent will see.

Time limits
Optionally, you can notify agents if conversations in their Active list have overdue actions. You can set time limits for the agent to apply categories (if you are using them), respond to the conversation, or add notes.
If the time limit is breached, the agent will see that conversation turn red in their Active list, reminding them to take action. It should be noted that the time limits are in relation to when the conversation arrived in the queue, not arrived with the agent, so it is possible for the agent to accept an offered conversation and for it to immediately show as overdue.
- Click to tick the check-boxes for the time limits you wish to use.
- For each, set a number of days, hours and/or minutes as the time limit.

Create the queue
Once you have selected all the options you want:
- Click the Create button.
Once you have an inbound queue, it is usually best to direct calls to it using a flow.